This dress is not the only thing in my life that went through a drastic change...
This week has been scary and exciting. I had my first week working as a seamstress. To be completely honest, I spent a majority of the time geeking out over the awesomeness of industrial sewing machines. I already feel like I am learning so much. I think it will really increase the quality of the things I make, which is outstanding. Plus, I am getting paid which is always good.
It's crazy to think that a year ago, my parents gave me a sewing machine for Christmas, and now I am completely in love with the craft, and looking to make a career doing it.
Also, this happened...
I have been on a complete 90's kick lately. Something heart-wrenching and nostalgic about a good 90's rock ballad. My personal favorite...
Song I can't stop listening to: The Freshman // The Verve Pipe
The bad news: I have been completely slacking on the blogesphere. I have let far too many projects go undocumented and it is sad and pathetic.
The good news: My boyfriends parents got me a dress form for christmas, and I introduce to you the first dress I made using it!!! And I only needed one yard of fabric. That's INSANE.
It's a wildly comfortable sweatshirt type material. I hate when people assume that just because I am wearing a dress, I must not be comfortable. Let's be real. Dresses are wildly comfortable. Especially this one. So comfortable, I made a hood for it...and then my roommates convinced me that it was far too weird.
What do you think? Are hooded dresses the best thing since sliced bread, or should I be content knowing I get to wander around town in a sweatshirt and have people think that I tried...
Total Cost: $1.50. HOT DAMN.
Sorry it's been forever, but the projects I have in store will probably make up for it. Just sayin.
Song I can't stop listening to today: Girlfriend//Streets of Laredo
Seriously, it's catchy as lace. (Sewing girls, please say you laughed at that joke)
I have stayed away from circle skirts because they are really time consuming and involve a lot of fabric. However, if you use something that is already round, and hemmed on the end...something like a tablecloth? Yes! Brilliant! I am so proud of myself! I found this tribal table cloth at an antique shop for $4 and I couldn't pass up the pattern, even though we don't have an actual table for me to put it on. What can I say, we're in college. We eat in our beds. But I had to use it for something!
There is a little math required for a circle skirt. The circumference of the circle will be the measurement of your waist, or where you want to waist to hit. Mark down that measurement as "c". You will have to fold the fabric in half, then in half again to form a triangle. You will now figure out the radius using the following equation: r = c / (2 x 3.14159). (Yes, that's pi! Hey there high school math!) You will need to allow a little extra for the seam.
From here, measure that distance from the point of the triangle, and create a curved line. Cut this line, and this will be the opening for your waist. Cut down a straight line down the back to create a seam.
The waist band was going to look better if it started at the pattern, so I removed pie-shaped segments from the skirt to make it smaller, and sewed along that curve. Once you've sewn your waist line, sew in an invisible zipper on the back seam. Finish off the seam, and you have a circle skirt. This whole process took me around 45 minutes and I was very satisfied!
Warning: This skirt will cause excessive twirling, and may have side effects. These side effects include dizziness, lightheadedness, vertigo, and nausea.
You think I'm joking, but the afternoon I spent twirling in this skirt almost lead to me vomiting on the side of the path you see below while yelling, "Can't stop twirling. Skirt so full. Must twirl."
Song I can't stop listening to today: Hey Ho/The Lumineers
This song is best listened to while making pancakes. Good day!
I usually enjoy things that most other people are hideous. Which is why, whenever I hear people laughing at thrift stores, I turn to see what they found. Chances are, I'll love it. That is exactly what happened with this sea shell romper. I shortened up the bottoms, switched up the neckline, and now it's wonderful! I apologize for the horrendous before picture.
A lot of things are changing. New blog layout (ah hem!) that I slaved over. One day I'll get the hang of these things. What do you think? The roomies say it seems more adult, which leaves me with mixed feelings. I am giving ombre hair a try, courtesy of a lovely up-and-coming hair genius named Paul.
I used to live right next to a building that was perfect for picture taking. But since I moved, I have had a hard time finding a home for my blog pictures. So, I have decided to take blog pictures in some of my favorite places in La Crosse, and that way you guys can understand why I love it here, and why I am getting nervous about saying goodbye to this place.
I'm just trying to soak up some of the last bits of Wisconsin summer, before I inevitably freeze to death.
And my official pick for song of the summer is: Photosynthesis by Frank Turner.
While this song is not new by any means, it's just so...relevant.
I always hesitate to explain how I do things because most of the time it's so simple like this, but I have gotten some requests for more demonstrations so here you are! Often times skirts can be transformed into something fun and fashionable in literally no time at all. People act like you must have some sort of sorcery powers to have come up with such magic, but it's really as easy as pie. I have come across so many skirts that I would have passed over before I began sewing, just because I didn't like the length. This floral skirt I found thrifting for $2 is a prime example. Here's how I haphazardly transformed this skirt in under 15 minutes. It's simple but effective.
1. Try the skirt on. Examine possible lengths. A mirror is really your best friend at this point.
2. Fold the skirt up to the desired length.
3. Pin the front of the skirt so you can remember this length when you are no longer in the skirt
4. Measure the length all around to make sure it's even, and finish pinning the skirt.
5. Sew the skirt by machine, or by hand. I almost always choose machine unless the fabric absolutely requires it because it's monumentally faster, and I have the attention span of a tiny bug. Just zip that puppy through.
Wahla! Combined with a shirt I thrifted for $3, this outfit cost me $5 total! That sounds like cause for celebration.
And I shall celebrate with one of my favorite happy tunes: Plage by Crystal Fighters
Warning: Unless you have consumed some sort of hallucinogen, don't look directly at this music video. Also steer clear if you are prone to seizures like myself. :)
You know the commercial for Pretzel M&M's where the pretzel jumps into the M&M creating something that's far superior and magical? Well that is sort of what I attempted today. I saw this shirt when I was shopping that was a lace tank top with a denim collar, and denim down the middle by the buttons. Needless to say, I fell in love. However, we were shopping for some shorts for my boyfriend, and I had purposefully left my purse at home so I would not spend any money. Plus it was $30. So I decided to make my own. I found a lace-esque shirt, as well as a denim shirt and fused them together to make the super shirt I had been hoping for. I included a little DIY for y'all, so you can have one of your own.
Time: 1-2 hours (but I'm a putz)
Cost: $2 for the two shirts ($1.20 and $0.70 can you believe it?!)
Difficulty: Jedi Initiate
Materials: Scissors, Shirts, Sewing Machine, White Thread, Pins
So here are the two shirts that I used for this project. It really doesn't matter which you choose, just make sure you like the colors together, the materials will work well in your machine, and that they are the same size. If they are different sizes, the collars will not be the same size and you may run in to a pickle. Before you start, remove the buttons from the lace shirt, do any ironing that may be necessary, and prepare your work space.
Step One: Remove the collar/button area from the denim shirt
Step Two: Remove the top part of the collar from the lace shirt, and my top part I mean cut off the part that folds over. You will be left with about a half inch of fabric.
Step Three: Replace the white collar with the denim collar, place the remaining white part on the inside of the denim. These should line up just about perfectly. Insert pins around the collar and down the middle by the buttons or snaps.
Step Four: Sew together the pieces that you have just pinned, starting with the collar to make room for adjustments.
Now if you are going for a seventies vibe, then you can stop here. If not, look forward.
Step Five: Remove the sleeves from the shirt, and pin the armholes at your desired width. Mine ended up being around two inches
Step Six: Finish off the armholes by sewing the edge you just cut inward. I had to add darts at the bust to make the sleeves sit correctly, but I think that just depends on the lace shirt you start out with.
Have you guys heard the Avett Brothers new song? It's called Live and Die, and they released it from their upcoming album The Carpenter. You know I'm a sucker for the Avett Brothers, and knowing I have to wait until September 11th for the new cd makes me about pee my pants.
Anyway, it's the song I can't stop listening to today: Live and Die/The Avett Brothers
Great song. And what you have been hearing from me in the past month. I am so very sorry, but I think when you see what I am about to show you, I will be on the road to forgiveness. So, I moved into a new apartment with five lovely roommates that I adore oh so much. More on them later. But, unlike last year, we are not allowed to paint. My room is an awkward off white, with hideous maroon carpet. Yet, I was determined to make my room gorgeous. Ladies and gentlemen, it is time for the big reveal...
And the best part, is the amount of money, or lack there of that I spent on this piece of paradise. Everything in this room was either made or thrifted. A shout out to my spectacular boyfriend (and cohabitant), as well as his father, who understood my scatterbrained sketches and helped build the combined desk, dress rack, headboard, etc. Although they thought I was crazy during most of the planning process, who can argue with these results?? I never ever want to leave my room, but that is a good thing for you because that means lots of sewing, and I have some awesome clothing transformations coming up for you this week. Maybe a few DIY's are in order for some of my bedroom treasures? Let me know what you want to make, and I'll tell you how!
Thanks for being patient with me. I really appreciate all of you.
This isn't the dress you're looking for...oh wait, IT SO IS.
You won't see any before pictures, and I'll tell you why: because I made this. Like, made it made it. This lovely Star Wars material was a vintage bed sheet. I have had it lying around for quite some time, but I had a limited about of fabric so I knew I would only get one shot.
Those of you who saw the sheet sitting around my house for months know how scared I was to start it. As nervous as I was, I am pretty happy with the way that things turned out. Therefore I am going to fill by day with Star Wars puns, and humming theme songs.
Speaking of today, I will be quite busy doing my roommates hair and make-up. This is the part where you think, wait doesn't she live with three guys? Yes, I do. But they are in the drag show tonight with a couple of their friends. I am in charge of make-up and wardrobe and I am so excited!! They are doing the mash-up of Rumor Has It/Someone Like You from Glee. Their dance is awesome. I will be sure to include pictures and maybe a video
I feel awful. Absolutely terrible. And there is only one explanation: the mass amount of puppy chow I consumed with my friends last night. Needless to say, I was in no condition to photograph the dresses I transformed over the weekend. Instead I am sharing with you a DIY that I'm sure all of you ladies out there will appreciate. It is seriously E.A.S.Y.
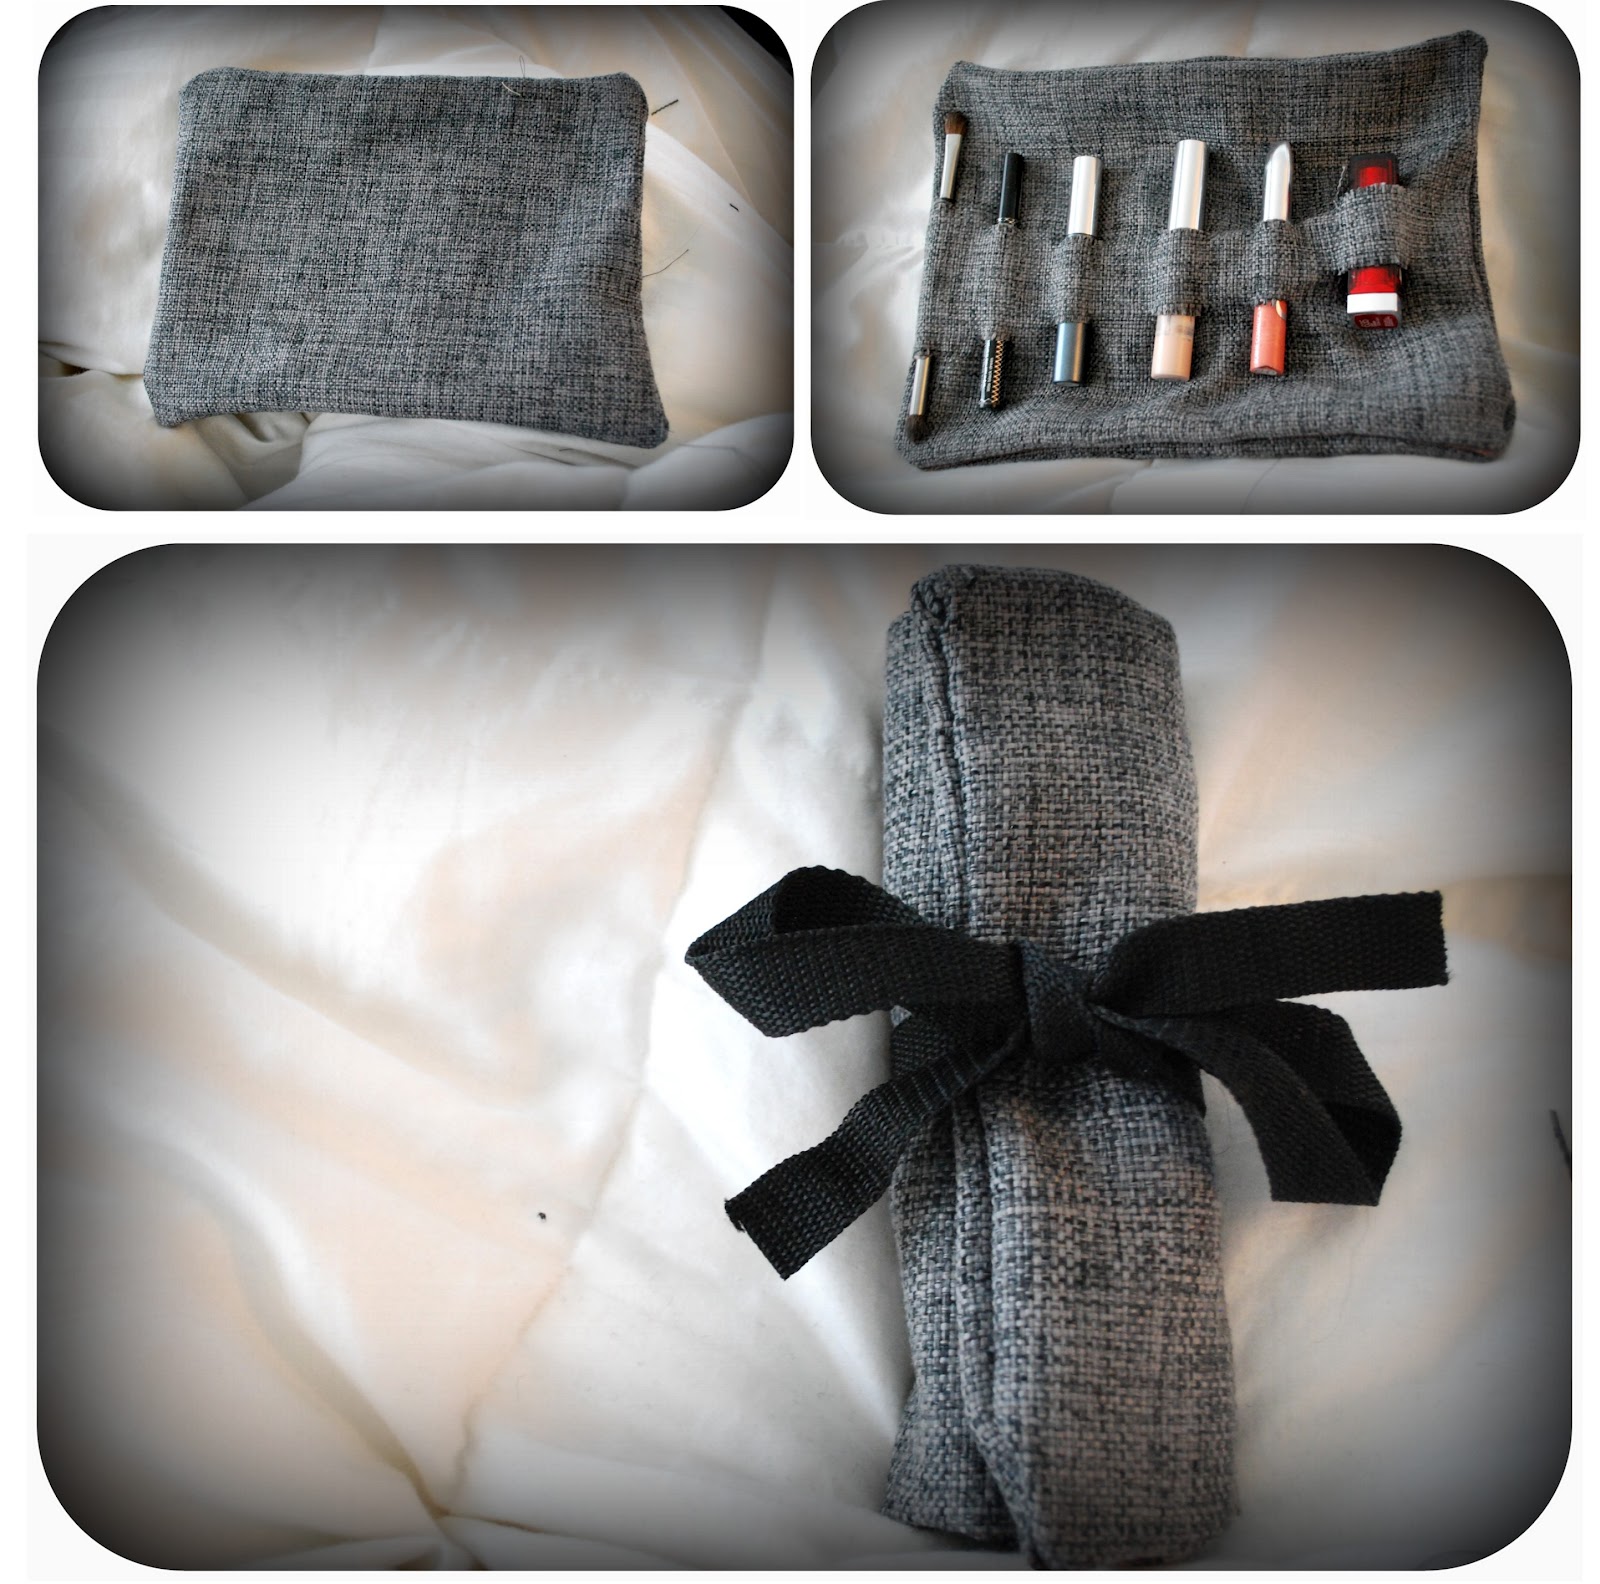
I don't know about you, but I am half asleep whenever I am getting ready in the morning. It is incredibly frustrating that the make up that I use on a regular basis is all the same shape. I spend 2 minutes searching for the mascara, only to pull out the eyeliner fifteen times. The amount of time I spend digging through my makeup bag is atrocious. Therefore I decided to come up with a simple solution to store those similar shaped items that I use on a daily basis. It really is so convenient.
Materials Needed:
-Piece of Fabric
-Marker
-Scissors
-Sewing machine (or needle and thread if that's your thing)
1. Cut the fabric in half
2. Place out the makeup where you would want it on one of the halves of fabric (you can even organize it in the order of use if you feel so inclined)
3. Mark the edges of the tools (on both sides) about 1 1/2 inches from the top and the bottom of the tool
4. Cut between the two marks on both ends, and slide the tool through the two holes.
5. Continue steps 3-4 with the rest of the make up you have selected.
6. Now sew this piece to the other half using a sewing machine or needle and thread. Sew all the way around the edges leaving a couple inches to pull it inside out. When you are finished, pull the inside through as you would a pillow, and finish the stitching with a needle and thread.
You can now place your tools in their designated spots, roll it up and tie a ribbon around it. Or an old backpack strand if that's all you can find (caught me!) I love it. Completely free because I used only found materials...and for that price, I say it's not half bad.
Song I can't stop listening to today (and everyday): Our Own Pretty Ways/First Aid Kit
I am not a jewelry person. The only jewelry I feel I can wear are very subtle necklaces. For real, I don't even have my ears pierced. I feel like every time I try to wear anything more, everyone looks at me and says, "That girl be crazy. Who does she think she is?" So begins my jewelry phobia. I so envy people who can pull of more statement jewelry. Nevertheless, I have been drooling over these DIY sweater clips I have been seeing on pinterest lately. I decided to make a simpler version for myself that wouldn't make me too self-conscious, using a creepy chain and a pair of clip on earrings. It was ridiculously easy and I think I like it!
I started this blog mainly so that my mom would be able to keep up with the projects I am doing. As I spent last night talking with her about it, I loved how proud of me she was. Before talking with her, I had been starting to second guess if I had done the right thing in starting this blog. It made a few friends upset who felt as if I was stepping on their toes, as they had been blogging for a while already. I am always worrying so much about what my friends are thinking or feeling. After spending a few hours with my mom, however, I remembered what this was supposed to be about. Me and her. Sharing with her pieces of my life that she doesn't witness as I am away at school.
A song that always makes me homesick: Some Day Soon-Alexi Murdoch
I fell in love with some headbands from Ruche, however the day I spend over $20 on a headband will be a sad day indeed. I have been meaning to make some of my own, but hadn't stumbled across the right materials. I managed to find all of this at thrift stores for under $1, and can now make beautiful headbands for myself. And friends. And their friends.
I simply measured the ribbon, and attached a small piece of elastic to the back with my sewing machine. I decided to go with the double strand headband instead of the single, because it's a little more Elizabeth Bennet, which is what I tend to go for. (1995 miniseries Elizabeth Bennet, none of this Keira Knightley nonsense.) To add the flower, I used a scrap piece of white felt. I made 5 flowers of varying sizes and sewed them together in the middle. I attached some spare petals in the back to fill in gaps.
I went to attach the flower, but I couldn't find my hot glue gun. Blasphemy! How could this be happening?? But then it occurred to me that I really enjoyed the headband without the flower as well. Brilliant! I decided to sew a bobby pin on the back of the flower, making it so I could wear the headband with or without the flower.
Sorry for the wet hair, I couldn't wait another minute to share this project! Are you going to make an amazing headband of your own?

 This dress is not the only thing in my life that went through a drastic change...
 This week has been scary and exciting. I had my first week working as a seamstress. To be completely honest, I spent a majority of the time geeking out over the awesomeness of industrial sewing machines. I already feel like I am learning so much. I think it will really increase the quality of the things I make, which is outstanding. Plus, I am getting paid which is always good.
 It's crazy to think that a year ago, my parents gave me a sewing machine for Christmas, and now I am completely in love with the craft, and looking to make a career doing it.
 The bad news: I have been completely slacking on the blogesphere. I have let far too many projects go undocumented and it is sad and pathetic.
 It's a wildly comfortable sweatshirt type material. I hate when people assume that just because I am wearing a dress, I must not be comfortable. Let's be real. Dresses are wildly comfortable. Especially this one. So comfortable, I made a hood for it...and then my roommates convinced me that it was far too weird.
 What do you think? Are hooded dresses the best thing since sliced bread, or should I be content knowing I get to wander around town in a sweatshirt and have people think that I tried...